


 3 minutes read
 Cypago + PagerDuty Integration
Leverage PagerDuty’s alerts and dashboards to enhance your security compliance automation with the Cypago Compliance Automation platform.
Below are the step-by-step instructions on how to connect PagerDuty to Cypago and manage this integration.
How it works
Cypago automatically collects alert events, configurations, policies, and multiple other data types from PagerDuty. This collective data is then analyzed against the security and monitoring requirements made by the security frameworks adopted by the user. The analysis result is a gap/compliant status, indicating whether the collected data satisfies the security compliance requirements. Based on the automated compliance analysis done by the Cypago platform, the user gets an in-depth understanding of its security compliance posture.
Requirements
The PagerDuty integration requires only a “read scope” permission in order to collect the compliance-related evidence data.
Support
If you need any help getting the PagerDuty integration up and running, please do not hesitate to reach out to us via email at support@cypago.com.
Integration walkthrough
Connecting PagerDuty to Cypago
It is very easy and straightforward to integrate PagerDuty into the Cypago platform.
- Login to your Cypago account and go to the Integrations tab.
- Click on Connect at the upper right corner to start the integration process.
- In the “Select Integrations” side panel, click on the Monitoring group, and then check the box near the PagerDuty logo.
- Click Next, and then Next again at the bottom of the “Select Integrations” side panel.
- In the “Connect Integration” side panel, click on the PagerDuty logo, and click on the “Connect Integration” button at the bottom of the screen.
- A “PagerDuty Sign In” pop-up window will appear where you should provide the email address you use to manage your PagerDuty account (if you are already signed in to your PagerDuty account you can skip this step).
- Click Next and then provide your password in the next window and click “Sign In”, or sign in using your Single Sign-On provider.
- If you have more than one account associated with the provided set of credentials, choose the main PagerDuty account you will be using to share alerts and other monitoring data.
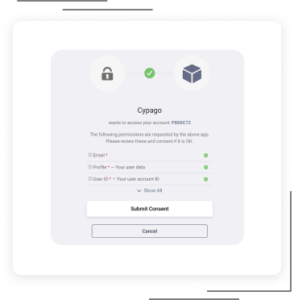
- In the “Request for user consent” window, you can review the specific permissions required, and then click “Submit Consent” to connect to the Cypago app.
- After few seconds a Cypago window will appear notifying on the successful integration. You can now click the Close button.
- Back to the “Connect Integration” side panel on the Cypago platform, click on the Done button at the bottom of the screen.
- PagerDuty is now successfully connected to the Cypago platform using the selected account. All relevant monitoring data will now be automatically collected and analyzed.
How to disconnect PagerDuty from Cypago
In Cypago:
- In your Cypago account, go to the Integrations page, and scroll down to the PagerDuty integration section.
- At this point there are two options: One is to disable the entire connection with PagerDuty, or to disable a specific account in case you’ve connected more than one to the Cypago platform.
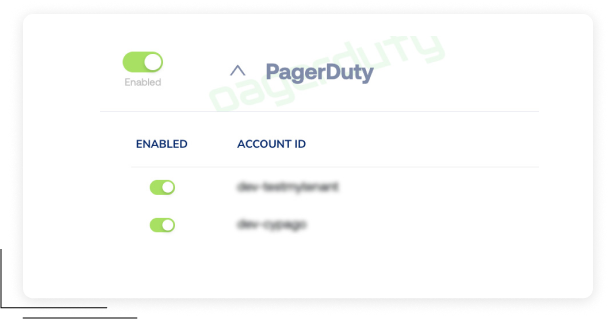
- In order to disable the entire connection, click on the Enabled switch to toggle the Disabled mode.
- If you want to disable only a specific account, click on the down arrow to open the detail view, and click on the Enabled switch near the account you would like to disable.
In PagerDuty:
- Login to PagerDuty using the same account you were using to connect PagerDuty to Cypago.
- Click on your Avatar icon at the top right corner and then click on “My Profile”.
- In the profile screen, click on the “User Settings” tab, identify the Cypago application in the Applications table, and then click on Revoke to remove the Cypago app from your account.
If you have any questions or comments, please feel free to contact us.